Joining our collection is a juicy watermelon piñata! It looks so good that I think it’s becoming my favorite – though I might not be entirely objective here 😁. This one is perfect for summer garden parties or birthday fun for kids. Follow this step-by-step tutorial to create your own watermelon piñata – I promise the result will wow everyone!
Materials You’ll Need
- A cardboard box
- Crepe paper in dark green, light green, white, and red
- Black paper (for the seeds)
- Masking tape
- Paper glue
- A piece of string or rope
- Packing tape (to reinforce the rope holes)
- Scissors


Step 1: Build the Base
Start by preparing the shape from cardboard. For a watermelon piñata, a simple rectangular box works perfectly.
- Cut along the strong packing-tape seams to weaken the box a little.
- Re-tape a few areas with masking tape so it holds together but isn’t too hard to break.
- Make two small holes at the top and thread a rope through for hanging. Reinforce these holes with packing tape.
- If you’d like to add the candy later, leave a small flap or “door” for filling.


Step 2: Cover the Base
Cover the bottom of the box with a flat layer of green crepe paper to make things quicker and neater.

Step 3: Prepare the Crepe Strips
To get that fun fringed effect:
- Cut a strip of crepe paper about 6 cm wide.
- Unfold the top layer so you have several layers stacked together.
- Snip along one long edge, leaving about 1.5 cm uncut at the top.
- Repeat across the strip to create fringe.
- Gently open up the strip – now you have your fringed piece ready to glue.


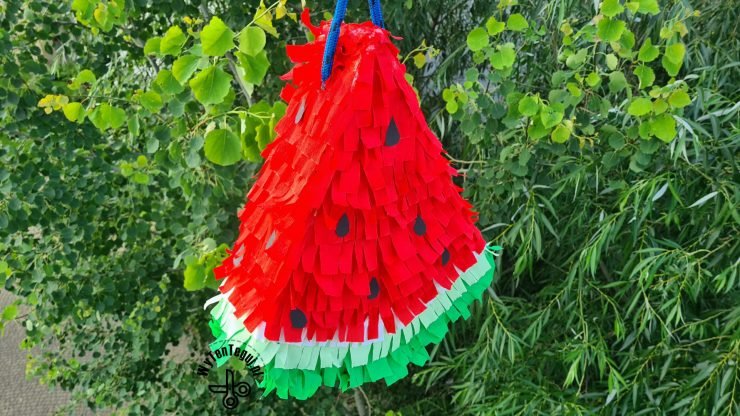
Step 4: Decorate Your Watermelon Piñata
Work your way from the bottom up, gluing strips in layers:
- Cover the bottom and sides with dark green strips.
- Add a band of light green just above.
- Then a thin line of white – this will be the rind.
- Finally, cover the entire top section with red crepe paper – that’s the juicy part!
For the finishing touch, cut little teardrop shapes from black paper and glue them onto the red area to look like watermelon seeds.
And voilà – your piñata now looks like a giant slice of watermelon! 🍉


Step 5: Make a Piñata Stick
Of course, every piñata needs a stick for the fun to begin. A sturdy broom handle works perfectly. Wrap it with strips of crepe paper in watermelon colors and secure them with tape. For extra flair, attach some ribbons or fringes at the top so they flutter when the stick is swung. Not only will it be useful for breaking the piñata, but it’ll also make a great photo prop 🎉.

Time to Play!
Now the fun part – fill your piñata with candies, small toys, or confetti, and hang it up. Players take turns hitting it with the decorated stick until it bursts open and releases its treasures. A wooden stick works best so it survives to the very end.
Isn’t it surprisingly easy? And the result is as sweet as a real slice of watermelon – only filled with candy instead of juice! 🍭

Check out our ideas
If you are looking for more ideas for playing with children, then you will find them in the DIY with children section.
Follow us in social media
If you want to be up-to-date with our newest posts, like our Facebook fanpage, follow us on Instagram and Pinterest.
Nothing gives more satisfaction than doing something yourself. I haven’t even thought about DIY as my hobby, I’ve just done different “projects” when it was needed. Sometimes it’s a disguise for the Masquerade Party in kindergarten. Another time, cutting out the pumpkin and baking the witch’s fingers for Haloween. Or simply organizing holiday souvenirs. Now I decided to share my realizations with you. Let’s go it together!
