Sometimes the simplest ideas turn out to be the most beautiful 💌
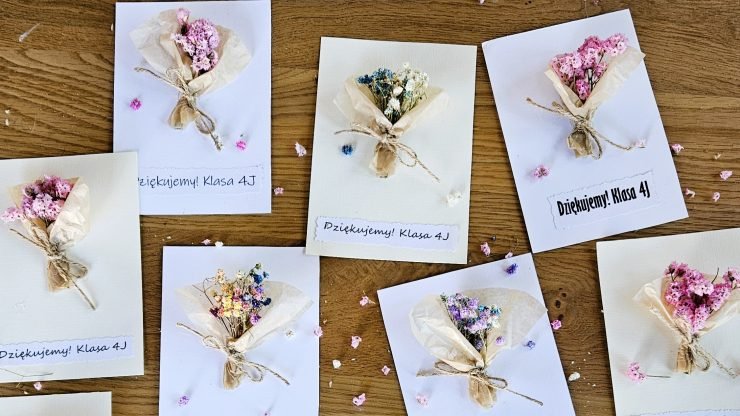
These handmade teacher thank you card with a tiny bouquet are a delicate mix of nature and craft — elegant, minimal, and full of heartfelt meaning.
At the center of each card is a tiny bouquet of dried gypsophila, wrapped in soft paper and tied with a rustic jute string bow. This small detail brings warmth and a natural touch to the design.
The clean white card base highlights the gentle colors of the flowers, while the message “Thank you” (often signed by the class) adds a personal, emotional note. It’s a simple yet special way to express gratitude at the end of the school year, on Teacher’s Day, or whenever you just want to say: Thank you! 💖

Materials you’ll need
- White cardstock base (A5 or A6)
- Dried gypsophila (baby’s breath)
- Thin wrapping paper, tissue paper, or parchment
- Jute or linen string
- Double-sided tape or glue dots
- Scissors or a craft knife
- Small paper labels for the text (“Thank you” / “Class X”) — handwritten or printed

How to make it — step by step
Step 1 – Prepare your card base
Fold or cut your cardstock to the desired size. For a look like the one in the photo, go for a vertical rectangular card.
Step 2 – Make a tiny bouquet
Gather 3–6 small stems of dried gypsophila and trim them evenly. Arrange them into a neat little bunch.
Step 3 – Wrap the bouquet
Place the stems on a small rectangle of paper (around 6×10 cm). Wrap the paper around the stems, folding the bottom slightly to create a natural cone shape. Trim any excess.

Step 4 – Tie it up
Wrap the base of the paper cone with jute string and tie a cute bow. Simple and rustic — that’s the charm!

Step 5 – Decide on placement
Lay the bouquet on your card to see where it fits best — usually slightly below the center.
Step 6 – Attach the bouquet
Use double-sided tape or glue dots under the paper wrapping (not on the flowers!). Press gently to secure it to the card.

Step 7 – Add the text
Prepare your label — “Thank you” and, if you wish, “Class 4J”. You can print or handwrite them. Cut them neatly (or tear slightly for a handmade look) and stick them below the bouquet.

Tips & ideas 🌿
- Preparing these with children? Pre-cut all elements and use double-sided tape instead of hot glue.
- No dried flowers? Use small artificial blooms or even paper ones.
- Want a neater look? Slip the bouquet into a small paper pocket instead of gluing it directly.
- For that slightly torn, vintage edge — carefully tear the label by hand or use decorative scissors.


Check out our ideas
If you look for more DIY cards ideas check our Cards section.
If you are looking for more creative activities for kids check our DIY with kids section.
Follow us in social media
If you want to be up-to-date with our newest posts, like our Facebook fanpage, follow us on Instagram, Pinterest and YouTube.
Nothing gives more satisfaction than doing something yourself. I haven’t even thought about DIY as my hobby, I’ve just done different “projects” when it was needed. Sometimes it’s a disguise for the Masquerade Party in kindergarten. Another time, cutting out the pumpkin and baking the witch’s fingers for Haloween. Or simply organizing holiday souvenirs. Now I decided to share my realizations with you. Let’s go it together!
